Table of Contents
Note
If you find this EDG documentation helpful please consider DONATING! to keep the doc alive and current.
| Maintainer:David Lloyd |
Expresso contains the JUnit framework - a unit testing framework that allows the individual components of Expresso to be tested and verified as functioning correctly. Expresso applications can (and should) also include a number of unit tests. Unit tests differ from Performance Tests (covered in the HealthCheck chapter) in that they deal with individual components, making it easier to locate and correct a problem before components are assembled into a finished application.
It was necessary to extend JUnit because Expresso applications expect certain system configurations to be available at any given time. These include database configuration, as well, as web-application location (which would normally be gleaned off of the servlet container). Further extensions were needed to be able to run test cases within a servlet container.
To accomplish this, we branched into two areas:
Client Side Testing: involves any areas that can be run without a servlet container. There are a surprising large number of subsystems that just need the underlying Expresso database framework, and not the servlet containers. This also contains a special case of Schema Testing that is covered below too.
Server Side Testing: involves testing of Servlets and Controllers.
You can use your IDE, like Eclipse or Idea or JBuilder, to run unit tests. Set up VM arguments as:
-Djunit.argv.configDir=./WEB-INF/config
            -Djunit.argv.webAppDir=./
            -Djunit.argv.testContext=default
            -Djunit.argv.logDir=/home/tomcat/logs
            -Djunit.argv.loggingConfiguration=./WEB-INF/config/expressoLogging.xml
Then choose a test suite to run. The do-everything test is: com.jcorporate.expresso.core.ExpressoTestSuite , which will run all JUnit tests.
Also, you can use the standard JUnit user interfaces for running unit tests such as the TextUI or SwingUI classes. For more information on JUnit, check out JUnit's Web Site
Expresso web applications can be tested via free tools like httpunit, which offer a brower-like client to test individual pages. Built on top of httpunit, Morebot has special support for Expresso, and can provide a cursory test the majority of your application by "spidering" (following links) it after logging in. Morebot can dispatch several of these tests simultaneously to serve as a load test for your server.
To provide a framework that we can perform client side testing with all standard expresso services such as logging, database connection management, and many others we provide the following class: com.jcorporate.expresso.services.test.ExpressoTestCase . To create your own test case use the following sample as a model:
import junit.framework.*;
import junit.extensions.*;
import com.jcorporate.expresso.services.test.*;


public class SampleTestSuite extends ExpressoTestCase {
	public SampleTestSuite(String name) throws Exception {
	  super(name);
	}


	public static void main(String[] args) throws java.lang.Exception {
	  //Set the system properties we need
	  junit.textui.TestRunner.run (suite());
	}


	public static junit.framework.Test suite() {
		return new TestSuite(SampleTestSuite.class);
	}

	public void test1() {
		//Do your testing code here
	}

	public void test2() {
		//Do more testing here
	}

	public void test3() {
		//You can do more testing here
	}
		/*....Do as many test cases as you want, all with the public void signature */
}
To run the test case, you need to set the following Java Virtual Machine parameters to:
junit.argv.configDir= junit.argv.webAppDir=
Usually in the command line you'll do this by having the command line:
-Djunit.argv.configDir= -Djunit.argv.webAppDir= -Djunit.argv.logDir=
The JUnit framework will automatically use Java Introspection to run all the public(void) test cases. See the JUnit documentation on how to use the framework to signal if a test passed or failed. Also, see the class: com.jcorporate.expresso.core.misc.CookieTests to see a fully functional sample of integration with JUnit Framework.
All expresso test case classes will play well with the JUnit test runners. So if you wish to run a text-based only test case, you can run junit.textui.TextRunner. If you wish to run within a nice graphical environment, you can run your test suite with:
To run all test cases within a graphical environment, run the class:
junit.swingui.TestRunner use the UI to pick the class you wish to test and let her run.
The -c will determine which test suite to run. You can use your own test cases, or use the class sample above to run all Expresso test cases at once.
There are a couple of necessary guidelines to follow when writing your own test cases:
Make sure that your tests are fully automated. This will indeed pretty much take the most work in creating your test cases, but without that automation, it is IMPOSSIBLE to spot any minor errors that creep into your code while refactoring. It cannot be stressed how much your time will be saved in the long run if you can think of ways to automatically check for proper behavior.
Whenever you need the expresso environment properly running, make sure you derive from ExpressoTestCase.
Always include a main() function. This allows for extremely quick testing while you're building your classes and tests.
When we're first creating our application, we want to make sure it runs correctly, right? But as we're developing our schema, and creating out databases, we have to each time go through the monotonous task of dropping a database, recreating it, starting up Expresso, running DBCreate, etc. This quickly becomes quite a chore. So we've created a special test case for testing Schema Creation. Here's all the code you need. The following example is borrowed directly from eForum and is complete:
import junit.framework.*;
Import com.jcorporate.expresso.services.test.*;
Import com.jcorporate.expresso.core.utility.DBToolTests;

public class SchemaTests extends DBToolTests {
 public SchemaTests(String testName) throws Exception {
	   super(testName);
   }

 public static void main(String[] args) throws Exception {
	   //Set the system properties we need
	   junit.textui.TestRunner.run (suite());
   }

   public static junit.framework.Test suite() throws Exception {
   		return DBToolTests.suite();
   }

   protected void setUp() throws Exception {
	   //System must be initialized prior to instanatiating the schema instance
	   TestSystemInitializer.setUp();
	   Class c = Class.forName("com.jcorporate.eforum.ForumSchema");
	   schemaList.add(c.newInstance());
	   super.setUp();
   }
}
That's it! To make this code work for your schema all you do is change the ONE line in setup() that loads ForumSchema to use your own schema class. When this class is run, it will make sure that all tables are removed from the Test database, and then attempt to create all schemas (Including Expresso's) in the test database. It will also run separately populateDefaultValues() and setupDefaultSecurity() so you can make sure that everything is cooprating.
This kind of testing is an extremely helpful and powerful tool for testing your schemas as you're building them.
The bulk of your web application is going to be logic within an Expresso Controller object, or possibly a standard Servlet. Unfortunately, standard JUnit client-side testing procedures definitely fall flat in being able to cope in this area. Enter Apache's Cactus project.
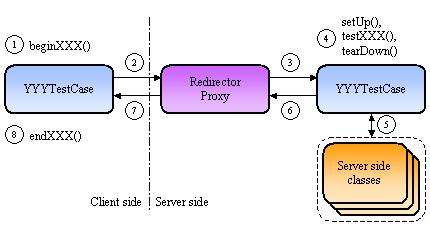
Cactus was designed to provide the unification of JUnit's client side testing API and in-container server-side testing. What it does is initiate a test case on the client side so you can stuff all the HTTP request parameters with everything you need such as state to request, login cookies, etc. The test case then serializes itself to the server, where a specially designed servlet loads your test class and executes the code on the server side. The result is then sent back to the client side so you can examine cookies sent back to client or other results.
Here is an animation created by the Apache Cactus documentation project that highlights what was said above.
If you are writing a servlet, the Cactus documentation will be sufficient to get you started on a servlet. Even if you're writing a controller test case, it is strongly recommended that you browse through the Cactus website to get an idea of how a Cactus test case is written since the controller test cases are extensions to a standard Cactus test.
If you are writing a controller test harness, there are quite a few things to consider such as having a running underlying database, negotiating security, and parsing the controller response. To assist in this, we've provided the classes: com.jcorporporate.expresso.services.test.ControllerTestCase and com.jcorporate.expresso.services.test.ControllerTestSuite
Below is a sample showing a simple usage of a controller test case (suite). All comments with a number are footnoted/explained in the area below the code sample.
import com.jcorporate.expresso.services.test.*;
import com.jcorporate.expresso.core.controller.*;
import org.apache.commons.cactus.*;
import org.apache.commons.cactus.util.*;
import junit.framework.*;
import org.w3c.dom.*;

import java.net.HttpURLConnection;
import java.io.IOException;
import javax.servlet.*;
import java.util.*;


public class SampleControllerTest extends ControllerTestCase {
	public SampleControllerTest(String name) {
	  super(name, "com.jcorporate.expresso.services.DBSecurityMatrix"); //1
	}


	public static void main(String[] args) throws Exception {
	   junit.textui.TestRunner.run(suite());  //2
   	}

 	public static TestSuite suite() throws Exception {
	   ControllerTestSuite cts = new ControllerTestSuite();  //3
	   cts.addReadOnlySchemaDependency("com.jcorporate.expresso.core.ExpressoSchema"); //4
	   cts.addTestSuite(SampleControllerTest.class);
	   return CTS;
   }


  /* Executed on the client side of the web request */
  public void beginPromptState(WebRequest theRequest) throws Exception
    {
        super.logIn(theRequest);  //5
        super.setupParameters("prompt",theRequest);  //6
    }

  /* Executed on the server side of the web request */
   public void testPromptState() throws Exception {
	   ControllerResponse response = super.controllerProcess();  //7
	   assertTrue("Got a null response", response != null);


		assertTrue("Title returned from the controller state.",
				response.getTitle().length() > 0);             //8
    }


	/*....Do as many test cases as you want, all with the public void signature */
}
Code explanations:
The second parameter to the ControllerTestCase's constructor is the name of the class you wish to test. In this case it's Expresso's own DBSecurityMatrix controller.
By writing a main method that calls JUnit's Text Test Runner, you have the ability to test out your classes and test cases by just running this class.
The controller test suite is responible for having a proper underlying test database running. If one doesn't exist, it will create it for you automatically, (including schemas), and if you need it to be erased when you're done, it will do that too.
This line(s) tells the test suite what schemas you must have up and running for your test case to work properly. To add more schemas, simply repeat the call for other schemas. Use addReadOnlySchemaDependency() if you DO NOT do any modifications to the underlying databases by running your controller. This will tell the system to not delete your created test database at the end of a run since it's still in pristine state. Call addSchemaDependency() if your controller modifies the underlying database in any way.
super.logIn() set's the appropriate cookies for a user Admin with a blank password. This is what is created by default in a test database.
The first parameter of setupParameters() is the name of the state that you will be testing with this test run. In this case it's "prompt". The function also sets the appropriate parameters for the Controller to return an XML formatted output.
The first confusing thing to know is that testXXXXXX() RUNS ON THE SERVER. Everything up to this point has been running on the client side. To process the controller, however, your job is simple, just call the ControllerTest case's controllerProcess() function and the testing framework will call your controller state automatically. This function will return a ControllerResponse object back to you, in effect, the data that the controller generated.
Once you get the ControllerResponse object you can walk through it's Inputs, Outputs, Blocks and Transitions to make sure they are as you would expect them to be. Use JUnit's assertTrue() and fail() functions to test if things were properly sent back.
You can take a look at the class com.jcorporate.expresso.services.controller.test.DBSecurityMatrixTests for a complete working controller test case that tests a couple of states including getting the results of a form POST.
To run the Cactus tests you need the following software pieces.
A database capable of dealing with more than one virtual machine connection . Sadly, this eliminates the possibility of using the Hypersonic Database that comes with Expresso as-is. There is a driver out there that uses RMI that allows more than one connection, but it is in a separate download available on the Internet.
A Servlet API 2.3 compliant servlet container: This includes containers such as Orion and the Tomcat 4 bundle that is included with the Expresso full download. If you only have a Servlet API 2.2 compliant container such as Tomcat 3, you need to separately download and install the Cactus jar for servlet api 2.2. Such downloads can be found at: http://jakarta.apache.org/commons/cactus/downloads.html
There is one step that has to be done for Cactus to run properly on your system.
Locate the file cactus.properties located in the WEB-INF/classes directory of your installation. Change the URL to the Cactus redirector servlet depending on your system. For most cases the URL will be very similar to what is listed already in the file. This allows Cactus to know where to send it's test case requests.
Before you can run your test cases. You must start your servlet engine. Otherwise the test case will fail when it goes to perform the server side code.
Run the class you are testing with the following Virtual Machine parameters:
-Djunit.argv.configDir=
-Djunit.argv.webAppDir=
-Djunit.argv.logDir=
Be sure these parameters have the proper values set.
It should be noted that to follow Extreme Programming's (XP) unit testing strategies, you will want to chain your test cases together. Check the example of com.jcorporate.expresso.core.ExpressoTestSuite for a clear example of this usage.
The following persons have contributed their time to this chapter:
Larry Hamel (JGroup Expert)
Mike Nash
Mike Rimov
Mike Traum (JGroup Expert)
Sandra Cann
Note
Was this EDG documentation helpful? Do you wish to express your appreciation for the time expended over years developing the EDG doc? We now accept and appreciate monetary donations. Your support will keep the EDG doc alive and current. Please click the Donate button and enter ANY amount you think the EDG doc is worth. In appreciation of a $35+ donation, we'll give you a subscription service by emailing you notifications of doc updates; and donations $75+ will also receive an Expresso T-shirt. All online donation forms are SSL secured and payment can be made via Credit Card or your Paypal account. Thank you in advance.

Copyright © 2001-2004 Jcorporate Ltd. All rights reserved.